The launch of Marathon Season 2 completely changed the old, rigid faction upgrade grind. Instead of needing faction upgrade unlocks to increase Runner stats, Bungie introduced The Cradle - a seasonal, player-driven progression system that allows you to allocate Energy Points across six distinct skill tracks to fine-tune your Runner Shell's base stats and unlock high-impact passive perks.
Because you can reset and reallocate your Cradle Energy at zero cost or penalty, the meta is fluid. However, spreading your points evenly across all six trees is a fast track to feeling underpowered. Instead, you should try to synchronize your Cradle investments with the strengths of your chosen Runner Shell.
You can map out your builds, test energy distributions, and preview these combinations using our interactive Cradle Visualization Tool.
The Six Stat Tracks & Perk Nodes
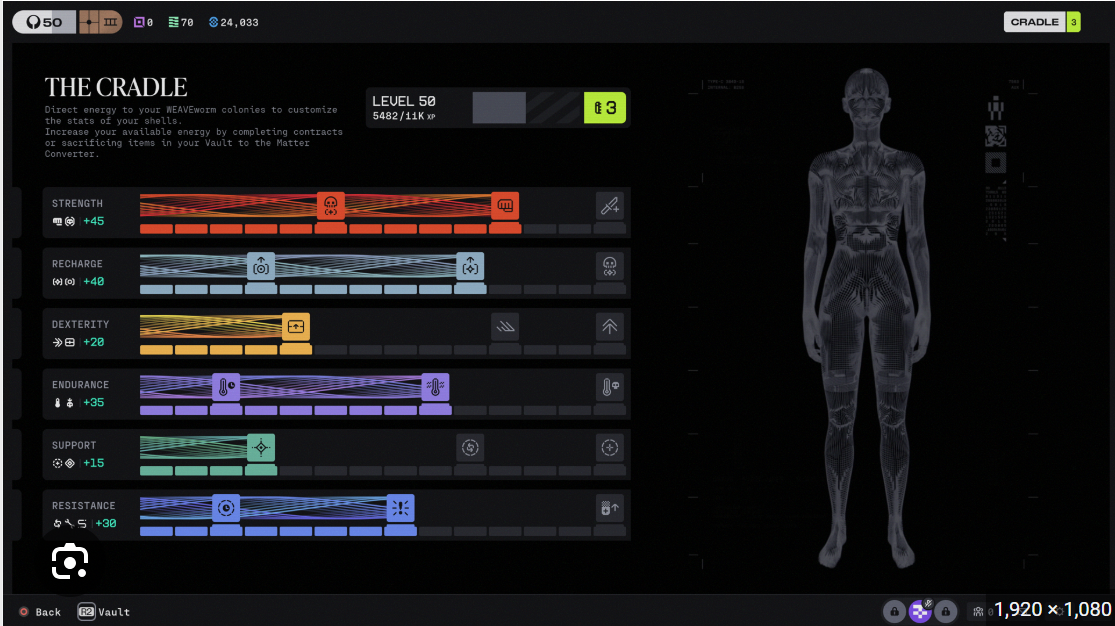
Investing a point into a track gives you a +5 increase to the stats that the track affects across all Shells. Pushing a track to specific Tiers rewards you with passive perks. Below is the complete, accurate breakdown of every track:
1. Strength
Stat Bonuses per Tier: Melee Damage, Finisher Siphon
- Tier 6 - Finisher Protection: While performing a finisher, you are more resistant to incoming damage.
- Tier 11 - Close And Personal: Your melee and knife attacks generate less heat.
- Tier 14 - Leech: Your knife attacks restore a small amount of health.
2. Recharge
Stat Bonuses per Tier: Prime Recovery, Tactical Recovery
- Tier 4 - Head Start: You start each run with a portion of your tactical ability charged.
- Tier 10 - Primed: You start each run with a portion of your prime ability charged.
- Tier 14 - Lethal Amp: Downing a Runner grants you tactical ability energy. Eliminating a Runner grants you prime ability energy.
3. Dexterity
Stat Bonuses per Tier: Agility, Loot Speed
- Tier 5 - Loot Siphon: Opening an unlooted container grants you bonus tactical ability energy.
- Tier 11 - Slider: Your sprint slide generates less heat.
- Tier 14 - Full Throttle: Gain the effects of a Cardio Kick for a short duration at the beginning of each run.
4. Endurance
Stat Bonuses per Tier: Heat Capacity, Fall Resistance
- Tier 3 - Quick Vent: Your heat recovery begins more quickly after actions that generate heat.
- Tier 9 - Heat Dissipation: Your generated heat recovers more quickly.
- Tier 14 - Heat Death: Eliminating a hostile reduces your heat buildup.
5. Support
Stat Bonuses per Tier: Revive Speed, Ping Duration
- Tier 4 - Tad Boost: TADs that you activate have an increased area of effect.
- Tier 10 - Factory Reset: Reviving a crew member restores a portion of your health over time.
- Tier 14 - Hush: You make less noise while healing.
6. Resistance
Stat Bonuses per Tier: Self Repair Speed, Hardware, Firewall
- Tier 3 - Scab Factory: While downed, you bleed out more slowly.
- Tier 8 - TCIV Resist: You take reduced damage from Ticks, lightning, and Heat Cascade hazards.
- Tier 14 - Field Medic: Your medical consumes take less time to use.
Optimal Cradle Builds by Runner Shell
Below are recommended Cradle investments that synergize with each Shell's base strengths. All builds assume 70 total Energy Points (the maximum), spread across categories at key perk breakpoints.
Destroyer

Key base stats: 15 Hardware, 20 Firewall, 15 Melee Damage, 10 Finisher Siphon.
Primary Cradle Focus:
- Endurance → Strength
Destroyers heavily rely on movement abilities (without cooldowns) that generate heat to change the tides of an engagement, so investing into Endurance early will allow you to use more abilities before overheating.
From there, Strength is a solid secondary option to boost your close quarter combat abilities, as the Destroyer is an in-your-face brawler. Melee Damage for the initial rush, and Finisher Siphon to quickly replenish your health in the middle of a firefight are big for Destroyer.
Vandal

Key base stats: 30 Agility, 25 Heat Capacity
Primary Cradle Focus:
- Endurance → Dexterity
Similar to Destroyer, Vandal heavily relies on heat-generating movement abilities - also some without cooldowns - to take full potential of her kit. Endurance should absolutely be the focus here, allowing you to utilize more abilities before overheating.
Focusing on Dexterity next will get you the T11 Slider Perk, which has a nice synergy with your Power Slide ability.
Recon

Key base stats: 25 Finisher Siphon, 25 Ping Duration, 20 Heat Capacity
Primary Cradle Focus:
- Recharge → Support
Recon's loop relies on ability uptime rather than movement or heat management. Recharge boosts Prime Recovery and Tactical Recovery, with Head Start (T4) giving ability energy at deploy and Lethal Amp (T14) refunding energy on eliminations.
Support extends Ping Duration, which synergizes with both your Echo Pulse and Tracker Drone.
Assassin

Key base stats: 20 Agility, 20 Firewall, 15 Revive Speed, 15 Loot Speed.
Primary Cradle Focus:
- Recharge → Strength
Assassin is similar to Recon in that it does not rely on movement or heat management as much as it does his abilities being used at timely moments, making Recharge the logical first category to focus on.
For me, I’d focus on Strength next, as one of my main ways of using Assassin is popping invisibility to rush opponents, and having that extra melee damage makes those stealth knife kills so much easier.
Triage

Key base stats: 25 Self Repair Speed, 20 Revive Speed, 15 Hardware, 15 Firewall.
Primary Cradle Focus:
- Recharge → Support
Triage is most useful when his abilities are ready to roll, so I’d opt to focus on Recharge first.
However, Support boosts Revive Speed directly, with Factory Reset (T10) restoring health when reviving allies - something you do every time you use your Prime ability Reboot+.
Thief

Key Base stats: 25 Loot Speed, 20 Agility, 20 Fall Resistance, 15 Finisher Siphon.
Primary Cradle Focus:
- Recharge → Dexterity
Thief has a game breaking Tactical Ability, Grapple Device, that is absolutely essential to have off of cooldown at the start of every firefight, so focusing on Recharge first is optimal here. While her other abilities aren’t super powerful in combat, having X-Ray Visor up more frequently will help with efficient looting and UESC encounters.
Dexterity gives Agility and Loot Speed - Loot Siphon (T5) grants ability energy from containers, and increased Loot Speed will help you it your The Finer Things passive bonus more quickly.
Sentinel

Key base stats: 20 Hardware, 20 Firewall, 20 Melee Damage, 15 Self Repair Speed, 15 Finisher Siphon
Primary Cradle Focus:
- Recharge → Resistance
Honestly, Sentinel is pretty useless without his abilities, so Recharge is a must here to have them up and ready as often as possible.
Once a firefight begins, Sentinel becomes a squad’s defensive anchor, trying to eat up grenade damage for the team. Focusing on Resistance second beefs up Self Repair Speed, Hardware, and Firewall which synergizes perfectly with his Castle Doctrine passive, which increases all of those stats when taking splash damage.
The Efficiency Secret: Farming Cradle XP Fast
If you are struggling to amass the Energy required to hit level 70 and fill these tracks, stop selling your high-tier items to vendors for basic Credits.
Season 2 added a batch-selection system to the Matter Converter inside your Vault. Instead of hoarding gold salvage-ables or weapons you know you won't deploy with, feed them directly into the Converter. A single gold weapon or high-grade Triage core vaporized in the converter rewards you with massive, instant chunks of Cradle XP, unlocking your next Energy token without forcing you to survive a dangerous hot-zone drop.
Furthermore, keep an eye on your inventory for extraction items like high-value bubble shields. Dropping down, popping contracts, and turning unwanted purple or gold gear into Cradle XP is the single most permanent investment you can make in Season 2 - remember, your gear can be lost in a bad extraction, but your Cradle Nodes stay locked in forever.
I’ll see y’all on Tau Ceti!